CRITICAL EDITION TYPESETTER
A system for typesetting critical editions on Personal Computers
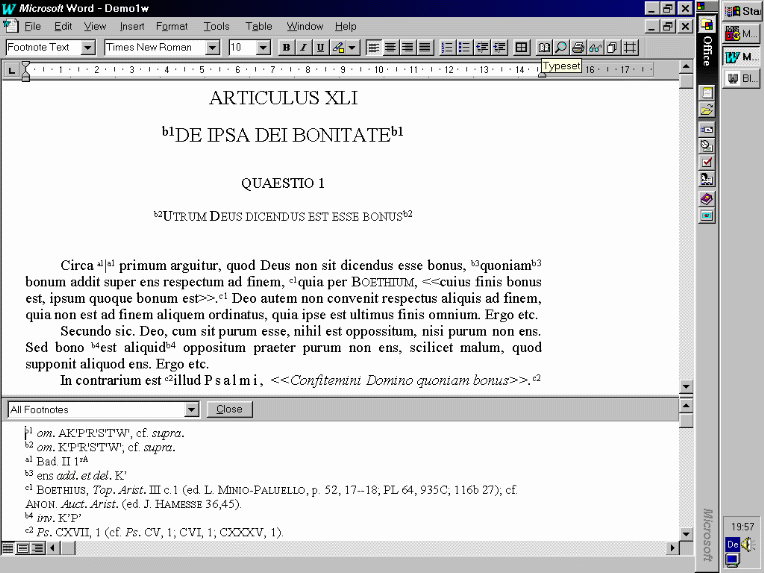
CET supports WYSIAWYG - What you see is almost what you get
Now you can use MS Word for Windows to create your critical editions.
No more cryptic CET commands, but almost WYSIWYG. The only limitation:
As MS Word supports only one footnote series, all entries in the
critical apparatus are displayed on the screen as ordinary MS Word footnotes:

The buttons in the upper right corner are the CET buttons:
Typeset, Preview, Print, PS-Preview, PDF-Preview, Settings
How to format your Word document for CET
- How to create a new Word document for CET
- Insert the footnote at the end of the lemma.
- Do not use automatic numbering of footnotes. Footnote marks for
footnote series 1 must start with a (b for footnote series 2,
c for footnote series 3, ...) and should be unique.
- Type in the footnote text (e. g., the variant reading).
- Insert the footnote mark at the beginning of the lemma as
plain text, select this mark, open the Style Box in the upper left corner,
and select 'Footnote Reference'.
- You must put a plain non-breaking space (Ctrl-Shift-Space) between
two adjacent footnote marks.
- Use the same procedure for endnotes.
- Optional hyphens are converted into the equivalent CET command (|-).
- Non-breaking spaces are removed.
- How to convert an existing Word document for CET
- The macro Word2W2C ("Word2<Word2CET>") converts an existing
Word document into a Word document for CET. Press Alt-Ctrl-Shift-W
in order to start the macro Word2W2C.
Click the Typeset button. This starts the following conversions:
Word document -> CET document -> TeX document -> DVI file
Click the Preview button in order to preview your document on the screen.
Please note: Before the conversions start, the Word document will be saved.
The CET document will be saved in the directory \CET\TEXT. If this document
exists, it will be overwritten.
The CET buttons and their functions
- Typeset: converts the Word document into a DVI file
- Preview: displays the DVI file on the screen
- Print: DVI -> PostScript -> printer
- PS-Preview: DVI -> PostScript -> screen
- PDF-Preview: PostScript -> PDF -> screen
- Settings: displays the CET settings for the current document
Print and PS-Preview ask for the range of pages to be printed/previewed.
You can specify a single page or a range of pages (e. g., 10-20).
Installation instructions
- Install Adobe's free Acrobat
Reader (required for PDF-Preview only).
- Upgrade your GhostScript to version 5.0.1
or later (required for PDF-Preview only).
- If you are using a version of CET earlier than 1.9.5:
Copy ps2pdf.bat into the
directory \cet (required for PDF-Preview only).
- Copy the decompressed
into your
Template Folder (e. g., \MSOffice\Templates). cetdoc95.dot
is a template for MS Word Version 7.0 for Windows 95. cetdoc97.dot
is a template for MS Word 97 for Windows 95.
These templates contain the macros Word2CET (converts a Word document
into a CET document) and Word2W2C (s. above) and the CET buttons and their
corresponding macros.
- Open demo1w.doc with Word
(demo1w.doc is an example, which can be used to check the
installation).
- Assign the template Cetdoc95 (Cetdoc97)
to demo1w.doc:
- Word Version 7.0
- File -> Template
- Press Attach.
- Select Cetdoc95.
- Press OK.
- Word 97
- Tools -> Templates and Add-Ins
- Press Attach.
- Select Cetdoc97 and click Open.
- Press OK.
- Click the Typeset button. Click the Preview button. Test the remaining
CET buttons.
- Use the Template Cetdoc95 (Cetdoc97) for new documents.
CET home page
© 2000-2004 by Bernt Karasch
( ).
All rights reserved. 2004-01-09
 ).
All rights reserved. 2004-01-09
 ).
All rights reserved. 2004-01-09